
I keep a personal collection of myriapods for my own research and edification. They’re preserved in vials of alcohol (also typical for spiders, soft-bodied insects, and other invertebrates) and are currently stored in my closet. When I first started collecting specimens, I used to write my labels by hand, but that has become…inefficient, to say the least. Once it came time to type out and print my labels, I asked around to see how others did it because I wanted to streamline the process. It became clear to me that many entomologists were either typing their labels manually or used a very specific system or software, all of which I did not want to replicate. So, I came up with my own system using Microsoft Word’s Mail Merge function that works pretty well and has saved me a lot of time. I’ve had some people ask how it works, so here’s how I make my labels, along with example files if you want to try it out for your own labels. I’ve broken it down into two sections in this blog post: Catalog Numbers and Locality & Species Labels.
Labels for alcohol specimens are slightly different from labels for pinned entomology specimens, so you’ll need to adapt these methods somewhat if you want to use Mail Merge to make labels for pinned bugs. The Mississippi Entomological Museum has an excellent page about making labels for entomology specimens, and was last updated in 2021. It’s a fantastic resource, though my labels differ in some specifics from what they describe. An additional resource for label information can be found in Means et al. 2015, which is a millipede-centric methods paper, but contains useful information for general entomology collection and preservation. Another useful labeling resource comes from The Society for the Preservation of Natural History Collections, which has a great wiki page on labeling.
I print all my labels with an old HP Deskjet 3526 printer (inkjet, never use laserjet printers for alcohol labels!) on Resistall paper. They’re sized to fit in vials that are about 68 mm x 15 mm, so if your vials are smaller, you’ll need to change the size of the labels to fit your needs.
If you want to follow along with the below methods, you can download my example files at the following links. I also link to them in the text below.
Catalog numbers:
Catalog numbers are included in each vial to identify the vial and its contents. They’re sometimes called specimen numbers, and they link physical specimens to their collection localities, species names, and associated information. They also streamline curating and digitizing a collection, and are typically added before final locality and species labels. For my collection, I use catalog numbers comprised of my initials and numbers: DAH#####. Theoretically, I could use these labels up to specimen DAH99999, but I doubt I’ll reach quite that high. Currently, I’m on specimen DAH02595, so I’m not worried about surpassing that upper limit. The catalog numbers themselves are about 27 mm x 6 mm with how I cut them.
I don’t have an involved process to make these labels. Whenever I get close to the end of my label sheet, I just open up Microsoft Excel, type in the first new catalog number I need, and autofill down the spreadsheet for about 800 rows. I then open up a Microsoft Word document and paste the numbers in.
The most efficient formatting I’ve found for the Word document is to make 6 columns per page using Arial font at size 12. I like to have the labels this large to easily identify whatever vial I’m looking at (and honestly would be fine with them being even larger), and smaller labels tend to be obscured by the locality and species labels. The Layout tab in Word is my next stop. I change the margins to 0.6 inches on all sides, and in the Columns dropdown area, click on “more columns.” This will bring up the Columns pop-up box. Next, I change the column width to 0.8 inches and the spacing to 0.5 inches, then click the “Equal column width” box. Underneath that box, next to “Apply to:”, choose “Whole document.” Back on the Layout tab, under the “Spacing” area, I set the Before spacing to 1 pt and After to 6 pt.
Sometimes after applying these changes, the labels still won’t be completely on one line and will spill over to the next one. To fix this, I move my pointer up to the ruler at the top of the page and hover over the cross hatches at the edge of each column’s margin. Once my arrow changes to a horizontal double-arrow connected by a line, I click and drag it right a little bit until all the numbers fit on one line each within their column.
I can fit 198 labels on each page this way, and usually I print 792 labels on four pages, which lasts me for about a year. If you want to see an example of my formatting, you can download an example of my catalog numbers here (for as long as I leave it on my Google Drive, at least). If you’re looking for a way to make catalog number labels with a barcode, there’s a Bash script that can be used for that.
Locality & Species Labels:
I asked my entomology colleagues on Twitter how they made their locality and species labels, and the answer was mostly writing them by hand or using a specific Excel template they had made previously. I definitely was not going to write my labels manually, and by the time I’m ready to make labels, I have all the information I need in a DarwinCore-formatted Excel file anyway, so I didn’t want to use a method that required me to re-enter my data. I settled on using the Mail Merge function in Microsoft Word, which streamlines my data entry step, but still requires that I manually edit the labels afterward. I don’t mind the final editing step; it helps me ensure that my labels are accurate before I print them.
Another option is to use the program EntomoLabels, but after playing around with it a bit, I couldn’t figure out how to make the labels I wanted. It seems a bit more suited to pinned labels anyway, but does look like it could be very useful once you get the hang of it. It’s also free!
To use Word’s Mail Merge function with your label data, you’ll need an Excel file with your label data to use as the source database. I generate my locality and species labels at the same time rather than separating them into different files because it helps me keep the labels for each of my vials together. I follow these steps to generate my labels and then make edits so that each label is in the same format: 6 lines maximum for locality labels and 3 lines for species labels, all in Arial font size 6. The size of my locality labels are about 40 mm x 17 mm and my species labels are about 40 mm x 10 mm.
Using Mail Merge to generate labels:
1. Open your Excel spreadsheet and copy the rows (including label row) you need to print to a new spreadsheet. (Already done for Hennen labels example.xlsx)
2. Change the Date column to the format you want on the labels (ex 12 Feb 2022). Highlight the date column and right click, choose "Format Cells." In the Number tab, choose Custom for category and in the type box, enter "d mmm yyyy". Make a new column and name it Date, but format it as Text. Copy the dates that are in the format you want and paste into Notepad++ (or other text editing program). Copy this data from Notepad++ and paste into your Text formatted column (this step strips away weird Excel formatting). Delete old Date column. Repeat these steps for the DateIdentified column as well.
If you skip this step, the dates on your labels may display strange formats due to the way Excel handles dates. This is the simplest and most consistent method I’ve found to fix that problem.
3. Format Lat and Lon columns as text to avoid weird Excel merge errors of adding extra numbers.
Skipping this step may cause your latitude and longitude values to display 12+ digits past the decimal point. I format my labels to have a maximum of four digits after the decimal point.
4. Change State column to abbreviations for each state.
5. Change Sex column from Males & Females to M or F.
If you prefer, you can use ♂ or ♀ instead of M or F.
6. Next, Open a blank Word document (or use the file titled "Labels template.docx" to skip this step). Change orientation to Landscape and change margins to 0.6" for all dimensions. Next go into Layout - Columns - More Columns to open the Columns formatting box and change the number of columns to 6. Mark the equal column width box and set width to 1.53" and spacing to 0.12".
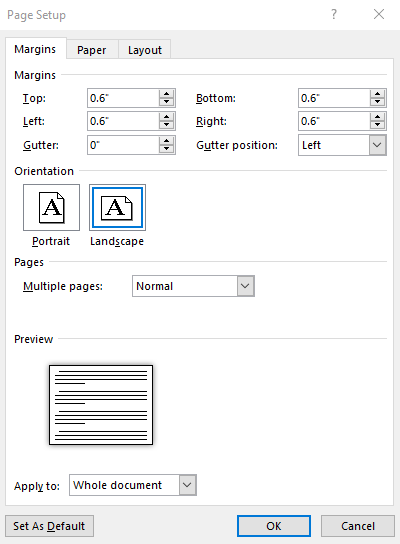
Formatting settings for the margins and orientation.
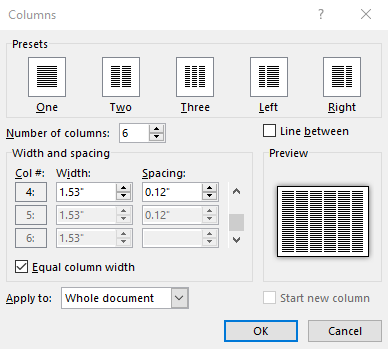
Columns settings.
7. Set font to Arial size 6.
8. Go to Mailings tab. Under Start Mail Merge, choose the Directory option.
9. Next click Select Recipients - Use an existing list. Choose your Excel spreadsheet with your data, and select the correct sheet if the file has multiple sheets. Check box for "First row of data is headers."
10. In the “Write & Insert Fields” section of the Mailings tab, click “Insert Merge Field” and choose the fields you want to include on your labels. I use the following fields, with the following spaces and punctuation inserted:
«Country»: «State»: «County» Co., «Locality». «Habitat». «Latitude»°N «Longitude»°W. Elev «Elevation»m «Date» Coll: «Collector»
The Microsoft support site states that "You can't type merge field characters (« ») manually. You must use the Mail Merge task pane." This holds true, so you need to manually select your fields and insert your spaces and punctuation each time you want to make a sheet of labels.
11. You only need to insert your merge fields for one label. The Directory option will repeat them for you to fill the document. Hit enter twice after inserting your fields for the merge so that your labels will have space between them.
12. If you’re generating your species labels on the same sheet as your locality labels, you can insert those Merge Fields now. I use these fields:
«Family» «Number» «Sex» «Life_stage»
«Genus» «species» «Authority»
Det: «IdentifiedBy» «DateIdentified»
You can preview how your data will appear in the Merge Fields by clicking the “Preview Results” button in the Preview Results section of the Mailings tab.
I make the first line bold and italicize the Genus and species names. Most of my specimens do not have subspecies epithets, so I do not add them here. If needed, I add them manually after generating the labels.
After inserting your label fields, hit enter twice so the labels will have space between them.
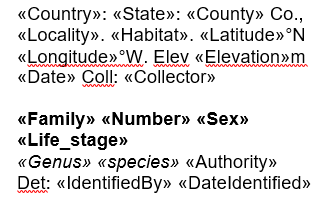
Locality and species labels with formatted merge fields.
13. Click "Finish and Merge" in the Mailings tab and choose "Edit Individual Documents." The Merge to New Document text box will pop up. Choose “All” under “Merge Records” and click Ok.
14. Word will generate your labels within a few seconds. The next step is to manually edit your labels to fit on a maximum of 6 lines (locality labels) or 3 lines (species labels). I use this editing step to perform quality control checks on the labels to make sure each label contains the correct information and to edit out extraneous information.
I make the following edits to my labels:
Make sure labels don't get split between columns.
Remove Elevation field if specimen doesn't have elevation information.
Make sure the negative sign (-) for longitude is on same line as the numbers.
Reduce locality and habitat fields as needed, remove extraneous information.
Check that all dates are displayed correctly.
Change number and sex to be correct on first line of species labels.
Tab the Number & Sex fields over to the right side of the label
Ensure locality labels are only 6 lines, species labels are 3.
Sometimes need to use Shift+Enter to move the Authority to the third line of the species label to save space if the genus and species names are long.

Example label. Left shows the Mail Merge output, right shows the labels after editing. The locality label was reduced from 8 lines to 6, and the species label from 4 to 3. This is a label for a large lithobiomorph centipede, Bothropolys multidentatus, a common species found under tree bark and logs in eastern North America.

Live shot of Bothropolys multidentatus, which is now safely preserved in a vial with the above locality and species labels.
Now that you’ve generated your labels, make your edits and final checks, then print! This method works nicely for me, and I hope it saves you some time as well.